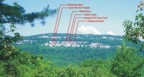
Shawangunks, Lost City (map)

Leading a first ascent of a route to the right of Resistance (5.11?)
Lichen' The Lip

About to pull the crux on a nice face climb at Lost City (5.10a)
Nest Route

Will leading Black Crack, a nice 5.10 crack left of Lost City Crack
Black Crack

Close-up of Will leading Black Crack
Black Crack

Will leading the crux of Black Crack
Black Crack

Shows the entire sequence on Cars that Eat People
Cars That Eat People

Series 1: Moving through the crux of Cars that Eat People
Cars That Eat People

Series 2: Moving through the crux of Cars that Eat People
Cars That Eat People

Series 3: Moving through the crux of Cars that Eat People
Cars That Eat People

Series 4: Moving through the crux of Cars that Eat People
Cars That Eat People

Series 5: Moving through the crux of Cars that Eat People
Cars That Eat People

Series 6: Just past the crux; placing the gold Camalot
Cars That Eat People

Jim climbing the hard-to-protect crack right of Resistance; this section of the route is 5.10b
Lichen' The Lip

Hidden off-width crack at Lost City
Evelyn

Below the crux of the hidden off-width crack at Lost City; we didn't make it this go
Evelyn

Just getting into the crux section of Lost City Crack
Lost City Crack

Will at the "pod" crux of Resistance
Resistance (aka Surprise Crack)

Will below of the Wishbone roof; the normal route goes out the right side of the large triangular block
Wishbone

Leading the 5.8 section up to the roof
Stannard's Roof

Just below the roof
Stannard's Roof

Lost City cliff, as seen from the Overcliff Road

Lost City with some points of interest labeled

Chris attempts the onsite
Gravity's Rainbow

Looking up from the cave at the base of the route, Chris climbs into the crux; the route is steep, overhanging from base to summit
Persistence

Climbing the tweaky moves above the initial roof of Survival
Survival of the Fittest

After clipping the fixed pins, Chris rests before the crux of the route
Survival of the Fittest